This build is extremely light weight and affordable. The build will cost around $30-$40 depending on where you purchase the material and if you need to pay for a 3D printed cases. This guide will be a step by step guide for building the most portable Meshtastic device I have found yet.
I highly recommend investing in a 3D printer if you do not have one. They are and will be invaluable for DIY projects and EOTWAWKI.
Things you need
- 1x Heltec V3 915MHz LoRa Device: https://a.co/d/evG2S61
- 1x 3.7V 3000mAh Lithium Rechargeable Battery 1S 1C: https://a.co/d/8GDS7tn
- 1x 3D printed case download: heltec-v3-small-case.zip
Things to know
- The Heltec V3 does not come with Meshtastic firmware installed. You will need a computer with a USB-C data cable. You may already have one laying around. If you don’t, every corner gas station or store has them for sale.
- You can purchase a single device and battery but I highly recommend purchasing at least two Heltec devices and multiple batteries. Having a single device does no good if you can’t communicate with someone.
- IMPORTANT!!! Be sure to purchase the Heltec V3 with SX1262 863 928MHz. You want to use the 915 frequency band. If you are in the EU, look for the 433 MHz version.
Step 1 – Flash Meshtastic Firmware
Once you have the Heltec device, plug it into your computer using the USB-C data cable. It will power on and you should hear your computer recognize the device. With the device plugged in, head over to https://flasher.meshtastic.org/ to start the flashing process.
- Select “Heltec V3” from the first dropdown.
- Select the first option under “Stable” in the firmware dropdown.
- Click “Flash”
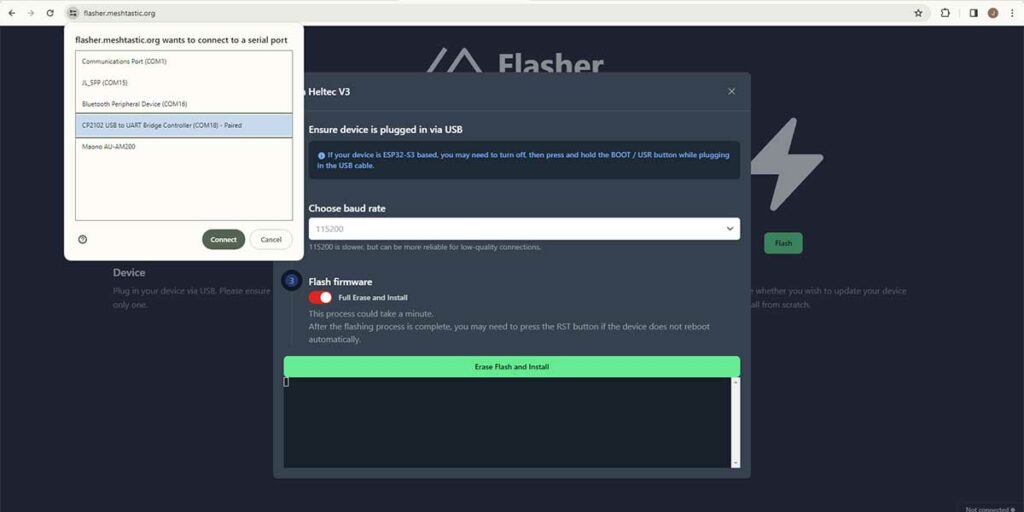
A window will popup and ask you to select the device from your computer. Select the device and be sure to do an entire erase and then start the flash process. It will take a couple minutes to complete. DO NOT unplugged the device during the flash process. Once the firmware flash is complete, the device is ready to configure.
Step 2 – Configuring the Heltec V3
With Meshtastic firmware installed on the device, you will now have the ability to connect via Bluetooth to the device with your mobile phone. You can connect to the device using the USB-C cable as well but if this is your first time, stick with the Bluetooth connection.
Head over to the app store and download the mobile app “Meshtastic”. Once the app is installed, you can start the configuration process on your phone. Be sure to leave the device plugged in to the USB-C cable for the time being. You will use the cable for power.
- Open the app and click on the “Bluetooth” tab.
- Select the device from the device list and it will ask you for a PIN. The PIN will be displayed on the Heltec V3 OLED screen of the device. Enter the PIN and wait for your phone and Heltec to pair.
- Once paired, click on the “Settings” tab in the app and change the region to “US”.
- Click “Save”.
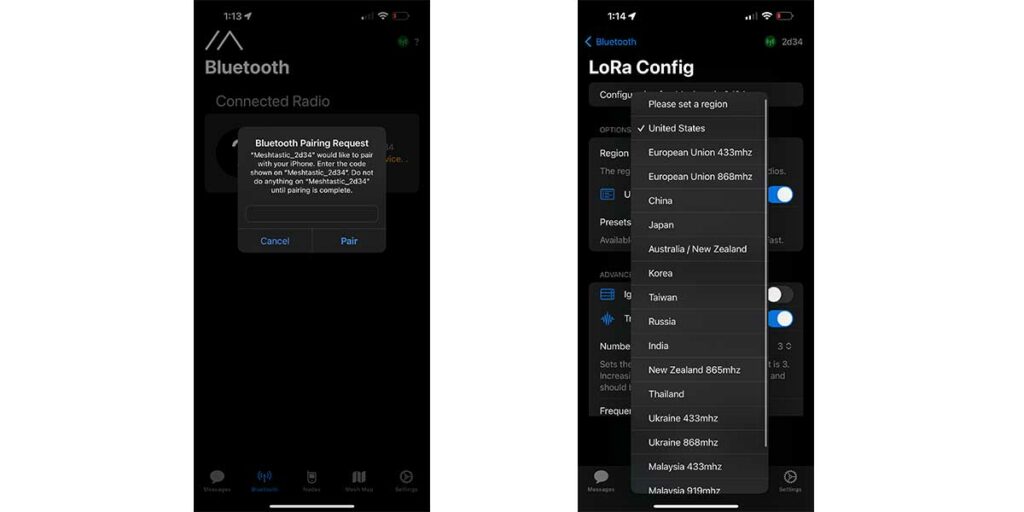
The device will reboot and then it will be ready to use.
For more advanced settings like encrypted channels, I will be putting together a post about how to set that up here shortly. For now, I suggest a configuration that will only use the primary channel which is automatically setup by default.
Step 3 – Print the Case
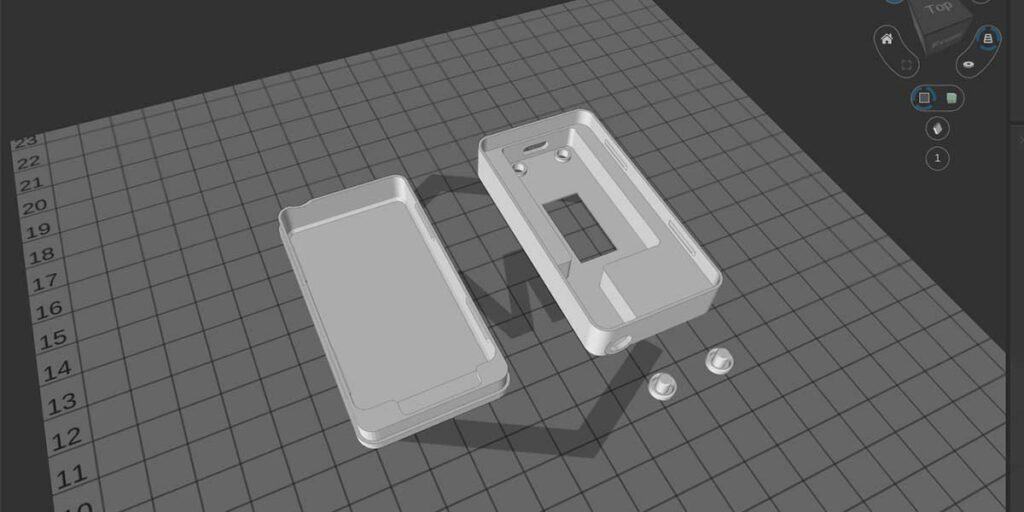
If you have a 3D printer already, simply download the gcode file provided at the beginning of the article. The gcode file has the front, back, and buttons provided for one print session.
Step 4 – Assemble the Device
All that is left is to assemble the device which is the easy part. Just be careful because things are tight. Be sure not to force anything too much and to make sure that the antenna feed is tucked away.
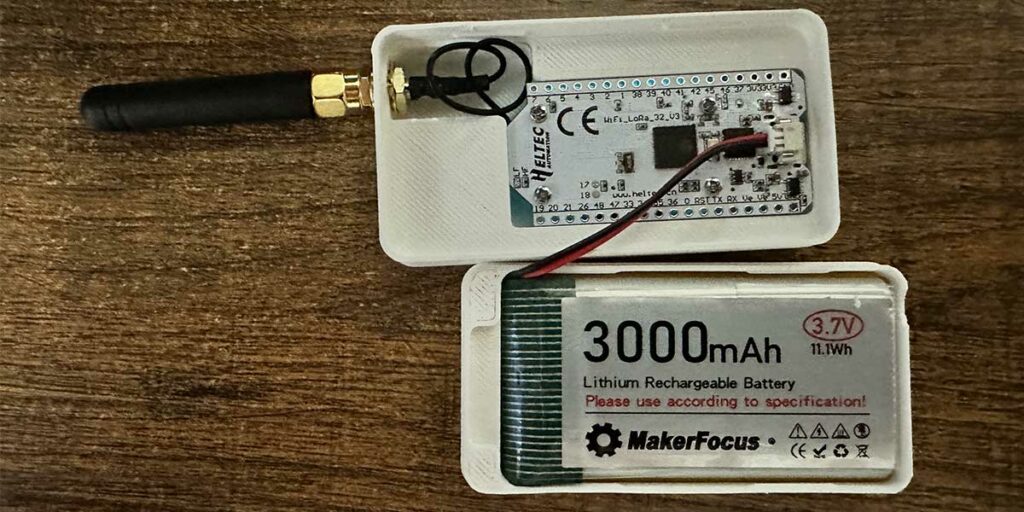
That’s it! You’re done.
Notes
- If you do not have a 3D Printer, reach out to me. I will print this case for you for $20 plus shipping.
- The case is not water or weather proof. Be careful where you store the device on your person.
- The device can be charged using a USB-C cable just like your phone.
- You can always reach out in the comments if you have any advice or questions about this build or Meshtastic in general.


Leave a Reply